Education Archives | Page 2 of 4 | LTrent

What Are Blind Spots in Driving

What Are Blind Spots in Driving | LTrent Driving School Blog

We’ve all heard the term “blind spot” before, but what does it actually mean when it comes to driving? In this article, we’ll discuss what blind spots are, how to identify them, and what you can do to avoid them. Stay safe out there!

What Are Blind Spots?

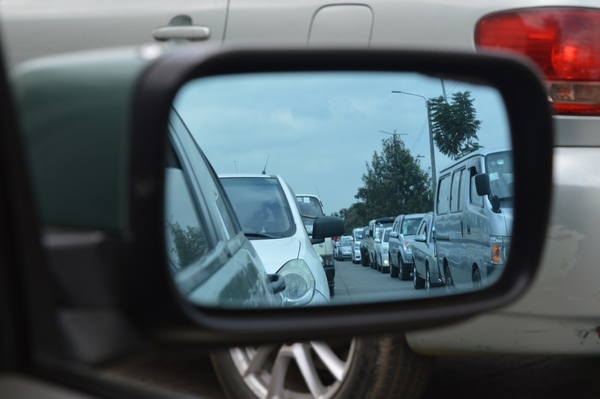
Blind spots are areas around a vehicle that the driver cannot see, either in the rearview or side mirrors or by simply looking over their shoulder. Because of their location, blind spots can pose a serious safety hazard, as they can easily obscure other vehicles, cyclists, or pedestrians.

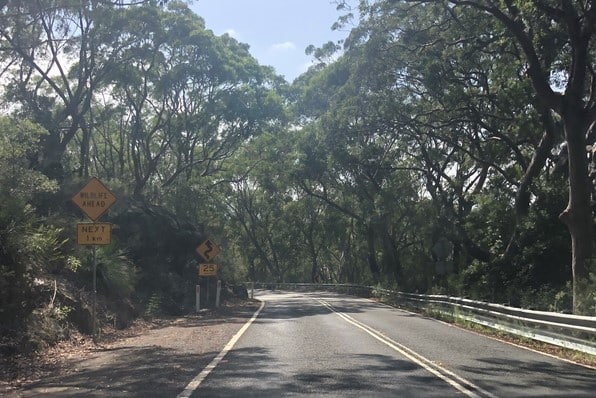
Blind spots can vary in size depending on the type of vehicle. For example, larger vehicles such as trucks and SUVs tend to have larger blind spots than smaller vehicles such as cars.

Dealing With Blind Spots

While blind spots are an inherent part of driving, there are some steps that you can take to minimise their impact. Here are some tips for dealing with your blind spots:

Know Where Your Blind Spots Are Located

You can’t improve your blind spot awareness if you don’t know where they are. So first things first, take inventory of where your blind spots are located. For most people, the biggest blind spot is directly behind their vehicle. Another common blind spot is at the periphery of our vision; objects that are far to the left or right may fall outside of our field of view.

Once you know where your blind spots are, you can start taking steps to mitigate them.

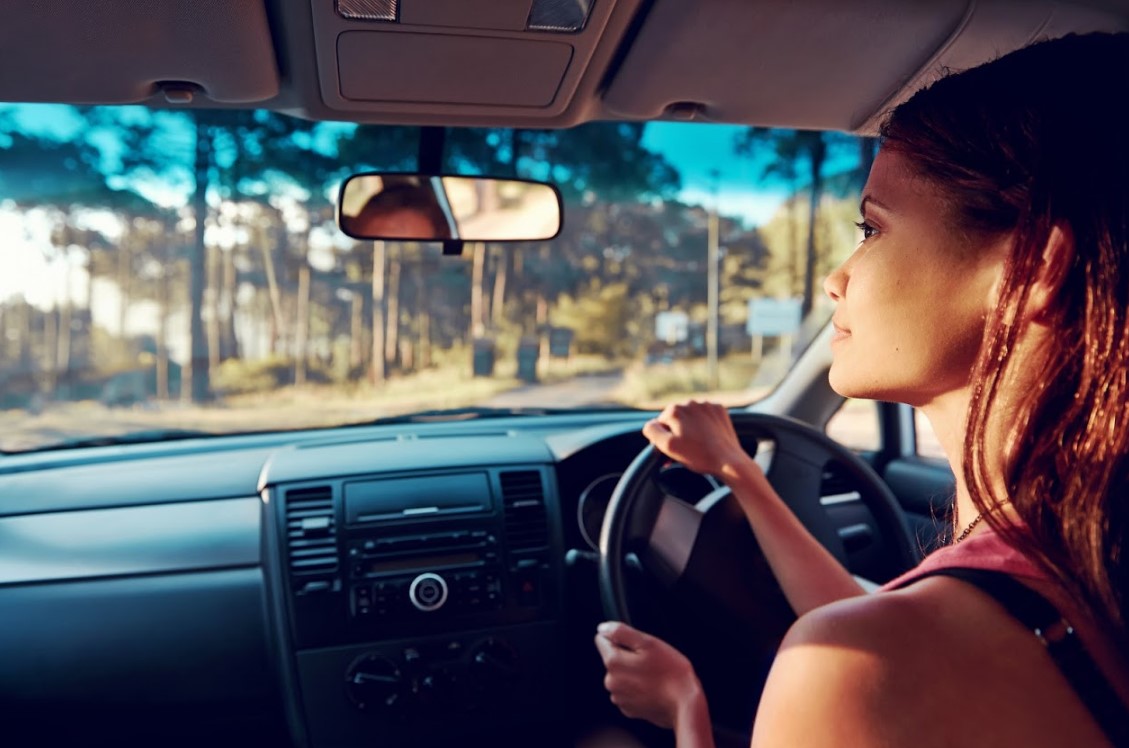
Adjust Your Mirrors Properly

Before driving, make sure your main mirrors are properly adjusted. They should be positioned so that you can see the entire width of your vehicle in them. You may also want to consider tilting them slightly downward so you can see the roadway behind you more clearly. In addition, be sure to use your rearview mirror when changing lanes or making turns.

Look Over Your Shoulder

Another way to reduce blind spots is to simply look over your shoulder before changing lanes or making a turn. This may seem like a simple task, but it can make a big difference in terms of safety.

Use Turn Signals

This is an obvious one, but it is worth repeating. Turn signals are there for a reason– to let other drivers know what you’re planning to do. Failing to signal can cause serious accidents, especially if another driver is in your blind spot. Make it a habit to always use your turn signals, even if there doesn’t seem to be any other traffic around.

When Should You Check Your Blind Spots?

The best time to check your blind spots is actually before you even get behind the wheel. That’s right, even before you start driving, you should take a moment to familiarise yourself with your car’s blind spots. This can be done by simply walking around your car and looking at where the mirrors are positioned. You should also check your blind spots before changing lanes, when merging onto a highway, and when making a turn.

The Ltrent Driving School Method

Want to improve your driving skills? The Ltrent Driving School offers a variety of courses to fit your needs. We have everything from beginner to advanced driving courses, and our experienced instructors are here to help you every step of the way. For NSW learner drivers the Safer Drivers Course is also a great way to get theory and practical driving lessons. Contact us today to learn more.

Book Your Driving Lessons

How to Prepare Your Car for a Road Trip

Royal National Park - Open Road

Once you have your licence, you have the keys to freedom and it’s time to head off on your first road trip. Exciting times. You’ve packed your bags but what about your car?
What should you check to prepare for your trip?

1. Tyre pressures
The most common problem that you are likely to have when you head out on a road trip is a flat tyre. A couple of days before you go, check the tyre pressures with a reliable gauge and fill to the pressure recommended in the owner’s manual or tyre placard on the vehicle. If you find that one tyre is lower than the others, have it inspected for a leak before setting off. Don’t forget to check the spare tyre too. There is nothing worse than changing a tyre by the side of the freeway only to find that there is no air in the tyre you just fitted!

2. Tools and Jack
Make sure that you know where the tools and the jack for the car are. If you have never changed a wheel, it is probably a good idea to have a go at jacking the vehicle up and removing a wheel before you head off. By doing this you can test and confirm that all the tools you will need are with the car and in working order.

3. Fluid Levels
Depending on how old your car is, you should check the fluid levels. Use the owner’s manual to identify where the following fluids can be checked:
Engine oil
Transmission oil
Coolant
Brake/clutch fluid
Power steering oil
Windscreen washer water
If you find any fluids are low, top up the fluid and have a mechanic check for leaks.

4. Lights
Often on a road trip some of your driving may be at night. On the freeway or on country roads there are no street lights. You will need rely on the quality of your headlights. Make sure that your headlights are working on both high and low beam and also check that the lights aim where you want them. While you are at it, check all the other lights on the vehicle, they will help you to be seen!

5. Carry Water and Food
It is good practice to carry some water and food with you out on the road. The amounts will vary depending on how remote you are heading. 10L of water and some food is good to have with you. The water can be used for hydration if you are stranded or can be used to top up overheating cooling systems to get you a bit further down the road.

6. Fuel
Lastly, make sure that you have enough fuel for the trip. If there is an accident or a natural hazard like a flood or bushfire, you may have to take a detour. If you only have enough fuel to get you to your endpoint, you may end up stranded on the side of the road.

Do I really have to indicate out of a roundabout?

Webp.net-resizeimage (89)

Yes…if practicable

The road rules state:
You must indicate for long enough to give sufficient warning to other drivers and pedestrians before entering a roundabout when turning left or right. You must also indicate, if practicable, on exit when going straight ahead. That way, people around you know exactly where you’re headed.
Doesn’t really offer much help does it?

So, when is practicable?

If you’re a learner driver and thinking about passing a driving test, then it’s practicable at every single roundabout.

There are two reasons for this:

The driving test

Firstly, you will be sitting a test where the examiner decides if you should have used an indicator to exit a roundabout. You don’t want to find that out that you got it wrong after the test. If you indicate on every roundabout you won’t be failed for signal errors.
If you find it difficult to signal out of a roundabout, particularly small ones, then it could be a technical issue. Turning right at a roundabout with too much speed or having an incorrect steering technique can make it difficult to use an exit indicator.

The power of habit

Driving is a practical skill and to be good at it, you need to build habits. When you are learning and practicing roundabouts, build a habit out of signalling out of every roundabout. This way you don’t have to decide when is practicable.
This rule about exiting roundabouts isn’t new, however, you won’t see many drivers applying it!

Check out our video below to see how it’s done:
Exit Straight

Top 6 Driving Fails

Top Driving Fails
Here are our top 6 driving fails:

1. Not keeping an appropriate gap
The most common type of accident in NSW is a rear-end collision.  Rear end accidents account for 28% of all reported accidents making this our number 1 driving fail! The most common cause of rear-end accidents is not keeping an appropriate gap.
2. Distractions
A rapidly rising cause of accidents is distraction, with smart phones taking priority over what is happening on the road. You might get away with it once, but soon enough your number will come up.
 3. Driving in the right-hand lane
We refer to the right-hand lane as the ‘head-on collision lane’. It only takes a tiny error by an oncoming driver for a head-on collision to occur. Head-on collisions account for  30% of fatalities on NSW roads.
4. Late decisions
The late decision maker likes to keep us all guessing as to their next move. They brake late and try to squeeze into turning lanes that they did not realise were coming up. Late decision makers do not have the time to consider other traffic when they make moves and are difficult to predict .
 5. Not indicating
There are some drivers out there that think that indicators are there to be used because the road rules say so. The reality is that indicators are there to communicate with other road users. Nothing more frustrating than the driver that gives their indicator half a flash just after they have changed lanes.
6. Trusting a green light
Green means go right? Well did you know that 16% of crashes happen at controlled intersections? Just because we have the right of way does not mean everyone else will give way. Make sure you are safe before entering an intersection or you are committing one of our top 6 driving fails.

Are you looking for logbook hours? Complete the Safer Drivers Course and get 20 logbook hours.  Book today

Are you being seen by other drivers?

Webp.net-resizeimage (71)
At most crashes one of the drivers will get out of their car and say,  “He came from nowhere” or “I didn’t see her”.
If you aim to be seen you will reduce your likelihood of being involved in an accident.

(more…)

The Kerbside Stop

You will need to do kerbside stops in the driving test.
This often overlooked skill is essential to gaining a licence.
Often it will be done on an uphill grade, especially for manual learners.
You will also need to perform the same manoeuvre as part of a reverse park or three-point-turn. Getting the kerbside stop wrong will make it difficult to pass your driving test.
Getting the kerbside stop wrong will make it difficult to pass your driving test.

Where can I do a kerbside stop?

When practicing kerbside stops, you will need to consider the road and surrounding area. Start on a quiet road so you have plenty of time.
You cannot park across a driveway, in a clearway or a bus zone. All parking signs need to be checked to ensure that you are parking in the appropriate place for the length of stay.
An often forgotten parking rule is that you need to leave at least three metres from any double unbroken center line to leave enough space for cars to go past.

How to do a kerbside stop?

To master kerbside stops, you will need to be proficient in the use of:

  • Accelerator and brakes
  • The gears
  • The clutch
  • Starting and stopping the car
  • Hand-over-hand steering technique
  • Vision
  • Safety cushion
  • Blind spots

When practicing your kerbside stop,  find a suitable place to pull into the kerb; be aware of all the traffic and pedestrian activity around the vehicle.
Once a good spot has been found you can start to drive towards kerb. The aim is to be 20-40cm from the kerb once you have stopped, with the wheels parallel to the kerb.
If you are parking behind another vehicle, leave about a metre gap.
TIP: If you are having trouble judging the size of your vehicle, a transit line can be set up from your eye through to a point on the windscreen or bonnet to the kerb. This will help you repeat your position. LTRENT Driver Trainers can teach you this trick if you are unsure.
When the vehicle is parked, apply the park brake, select park in auto vehicles or first gear in a manual.

When you are leaving the kerb, the first step is to get the vehicle ready to go.
Start the motor and select drive or 1st gear. Make sure that there is enough room for you to the clear the car in front of you. Reverse a little bit if you need more space.
Check the mirrors to find a space to pull out into. Signal your intention to other road users with your indicator. The indicator needs to be on for five seconds before pulling out.
Just before you leave the kerb,  check your blind spot in the direction that you are moving. There could be a car pulling out of a driveway that you cannot see in your mirrors. If your blind spot check comes back clear then you can leave the kerb.

How do will you know when you are an expert at the kerbside stop?

At the highest level, you should be able to pull into a space that is about 2 car lengths long and be parallel first go in a busy traffic situation. You will also be able to pick and take an appropriate gap in busy traffic up a hill with cars parked either side of us.
More on manoeuvres: ANGLE PARK

Manoeuvres: Angle Parking

Do you need to know how to angle park?

Angle parking is not often in the driving test. This does not mean that you won’t have to do an angle park in the test. Often the driving test starts or ends in angle parking.

Aside from the test, you are going to need it in real life. Just like reverse parking, angle parking is a skill that most drivers just do. Before we can perform an angle park, we need to be proficient in the use of:

  • Accelerator and brakes
  • The gears
  • The clutch
  • Starting and stopping the car
  • Hand over hand steering technique
  • Blind spots
  • To and from the kerb
  • Slow moving forward
  • Up hill starts
  • Down hill starts
  • Reversing
  • Slow speed control
  • Road signs and markings

In addition to the above skills we need to have a really good feel for the size of the car. When we are performing an angle park we need to be uncomfortably close to other vehicles to succeed.

Where to do an angle park

Angle parks are found in all shopping centres, shopping strips and most car parks. They can be 90º, 60º or 45º.

How to an angle park

When we are doing an angle park we need to keep the vehicle moving slowly and smoothly and turn the steering quickly.

Firstly we pull up a little bit past the parking spot that we want to park in, about a meter out from the cars we are parking next to.

As we reverse back we need to find the spot to start turning into the parking spot. In most cars it is when the rear wheel is in line with the first corner of the car you are parking around (for 90º).

We need to adjust the starting point to for 60º and 45º parks. At this point we start to turn into the parking space, this will feel too close! As we are moving into the parking spot check your mirrors to evaluate your position in relation to the other cars. If you can see a gap between the bumper of the car you are parking around and the side of your car then we are OK.

Once the rear wheels are past the car we are parking around we need to move our focus to the car on the other side of the car spot and the lines. If we can see more of the car next to us coming into view then we are clearing it, if the view in our mirror is not changing then we might be on a collision course, stop!

As we are starting to line up with the lines we need to start straightening the wheels and reverse back in a straight line parallel to the parking lines. When we are far enough into the spot we can stop.

When we are leaving the spot make sure to move out in a straight line for at least half a car length before turning the wheels.

Driving in forwards is pretty straightforward, just make sure that you use a wide arc to enter the spot so that you are going straight as you are entering the spot. If you are reversing out of a spot make sure that you go almost fully out before turning the wheel so that you avoid bumping other cars and posts.

How do we know that we are expert?

The toughest situations for angle parking are when there is lots of traffic, say the week before Christmas at the central shopping centre. You only have one spot available, it is narrow due to the large 4wd vehicles parked either side. If we can do this first go (and leave enough space to exit the vehicle) then we are winning!


More on manoeuvres: REVERSE PARKING

How to make your testing officer feel comfortable

driver and trainer
The Aim of the Test
Learner drivers usually hear stories from their friends on what the driving test is going to be like and advice about what to do. Some of this is true, most is not.
During the driving test, the learner driver’s aim is to make the testing officer feel comfortable, that is, they feel safe in the car with you.
Setting off in a controlled manner and driving confidently right from the outset will make the testing officer more relaxed.
Generally, if the testing officer is chatting with the learner driver, this is a sign that they feel confident. If they are using the grab handles then they might not be feeling so comfortable!

Appearance Counts
Webp.net-resizeimage (20)
The test starts before the learner driver gets into the car. The learner driver wants to make a good first impression to the testing officer.
Follow these points:

  • Don’t be late
  • Be neat and tidy
  • Smile
  • Have all paperwork sorted out and neat (look after your logbook)
  • Have a clean car parked in the correct location
  • Know how to operate the indicators and brake lights without the engine running

How to drive during the test
Be seen
We have heard from some students that they have been advised to drive 15 km/h below the speed limit. This is not a good idea, it will make the testing officer question the learner driver’s ability. It is best to drive with the flow traffic up to the speed limit unless there is reduced space or vision, then slow down as required.
You may hear stories that everyone fails for head checks or blind spots. While this is often true, the solution is not to look like a laughing clown at Luna Park while driving. You need to understand what you are looking at, then you can check the appropriate blind spot, the traffic and do observation checks for the situations presented. Testing officers are onto people who are looking just for show and will be really picky about observation errors for these applicants.
Learner drivers need to make safe decisions. We have all been in the situation of waiting to do a right-hand turn onto a busy road waiting for a gap (high risk of accident). This will be on the test too. You cannot be swayed by the aggressive driver four cars back honking the horn. If there isn’t an appropriate gap, then wait till one comes along. The testing officer would prefer the driver to wait for a safe gap than have a go at a gap that is not big enough. Remaining calm in this situation will show the testing officer maturity in your driving.
Sometimes things go wrong on the driving test. The car might be stalled or your reverse parking may be botched. Remember these two things – the testing officer is human, they might not have noticed the mistake and it is OK to make a couple of errors, often they are not marked as harshly as you might think.
It is most important the learner driver does not give up after the first mistake. Just take a deep breath, relax the grip on the wheel and carry on.

Getting Results
Thanking the testing officer regardless of the result will put them in a better mood for the next applicant!
If you are not successful on their first attempt, don’t argue with the testing officer about the result. There is every chance that you will end up with the same testing officer in the next attempt. That will make for a very quiet drive…

Driving Test Intricacies: The Test Car

There are many components to the driving test. Many of these driving test intricacies can put positive or negative impressions in the mind of the testing officer. In this post, we explore the details of the test car.

What car can be used for the driving test?

Service NSW does not provide a test car for learner drivers on the test day. However, the learner can take the driving test in any registered vehicle matching the licence class they are being tested for. This must be a vehicle that weighs up to a maximum of 4.5 tonne Gross Vehicle Mass (GVM) and seats no more than 12 people. We, of course, do not recommend taking a moving truck to the test.

What will the testing officer be looking for?

The testing officer will check that all the brake and signal lights are working correctly, and have no cracked or broken lenses. This is to ensure the safety of the driver, the passengers and the other drivers on the road. A learner driver needs to be able to communicate properly on the road with correct signals during the driving test.

Other safety essentials include a clean and crack-free windscreen without chip damage, tyres that are not worn out and rims without any sharp edges from crash damage. Inside the car, the testing officer will check to make sure the seat belts are functioning properly.

How can the testing officer be helped to feel comfortable and safe in the car?

Having a half-eaten Happy Meal, the dogs breakfast (we mean that literally) and school textbooks that can fill a library in the back seat of the testing car is not the ideal way of impressing your testing officer. Yes, impressions do count. Make sure the car is clean and free of debris that may become a hazard in an accident. We recommend that it doesn’t smell like month old unwashed laundry either. Let’s make the testing officer feel comfortable when they enter the car.

Although a BMW for example may excite some testing officers, more often than not they will fear the learner may go over the speed limit. BMWs tend to do that to drivers… We recommend using a car that is less aggressive and places an emphasis on safety first.

What is the Trent Concierge?

The Trent Concierge is a driving test concierge service. Trent Driving School ensures that all the other variables are eliminated and the learner driver only concentrates on the task at hand: the driving test.

The Trent driver trainer will pick up the learner on the test day from home, school or work. The driver trainer will also warm up the learner during the drive to the testing location, and present them to the testing officer. At the end of the test the student will be driven back to their original location.

The Trent Concierge car won’t have rubbish floating around on the floor, or McDonald’s ready for the testing officer on the backseat – although we may want some to fill our stomachs before the test. Nor will the car have any safety concerns such as broken tail lights.

Most importantly, testing officers feel more at ease in our dual-control fitted cars, as they have a braking pedal on their side of the footwell.

Read more:
WHAT’S IN A DRIVING TEST?   |  DRIVING TEST SUCCESS

The Safety Cushion

The Safety Cushion is the clear space drivers need to maintain around their vehicle to give reaction, manoeuvring or stopping room in any situation and at any speed.

Your Safety Cushion surrounds your car to the front, sides and rear,  this is your territory and you should stringently guard against others entering it.

As you drive, you will need to maintain your Safety Cushion by adjusting your speed or, your position on the road.

A Safety Cushion will give you more time to spot any hazards that may arise.

NOTES: The Safety Cushion is variable and will alter with speed and traffic conditions.
More space is needed between cars at 100km/h than at 20km/h, so your Safety Cushion will increase with speed.
To maintain an adequate Safety Cushion to the front you need to:

  • control your speed to suit the road and traffic conditions
  • keep a safe distance between your car and the vehicle in front

Other drivers may see your Safety Cushion as a clear space to move into. In this case, you will need to adjust your speed and reclaim your space.